Where to start, what color to use, and how to stop your brows from looking like a marker line — all of it, finally explained simply.
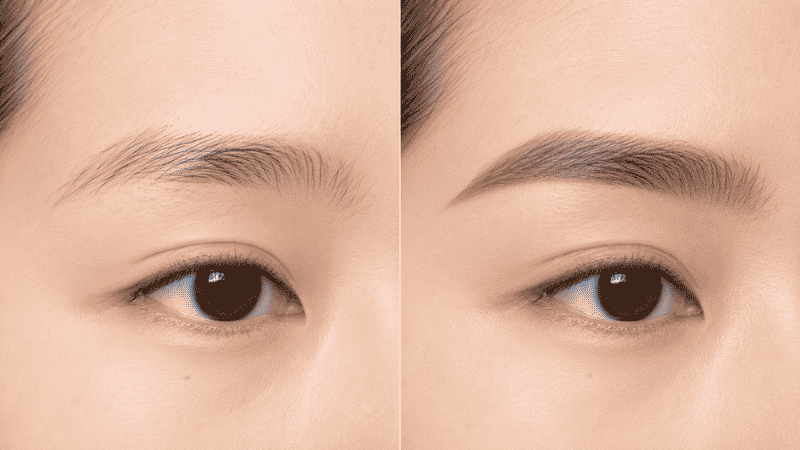
You picked up an eyebrow pencil, filled in your brows, and stepped back to look. And what you saw looking back at you was not enhanced brows. It was two slightly different dark blocks sitting on your face, looking like someone drew them there with a crayon. The exact thing you were trying to avoid.
Eyebrow filling has this reputation for being simple — just color them in, right? But the difference between brows that look naturally fuller and brows that look obviously drawn on comes down to a few specific things that most tutorials gloss over. The starting point. The color choice. The pressure you use. The direction of your strokes. Get one of those wrong and the whole look shifts from natural to theatrical.
This guide covers how to fill in eyebrows in a way that actually looks like your real brows, just better. No brow mapping charts, no professional techniques, no products that cost more than your lunch. Just what actually works when you’re learning.
Key Takeaways
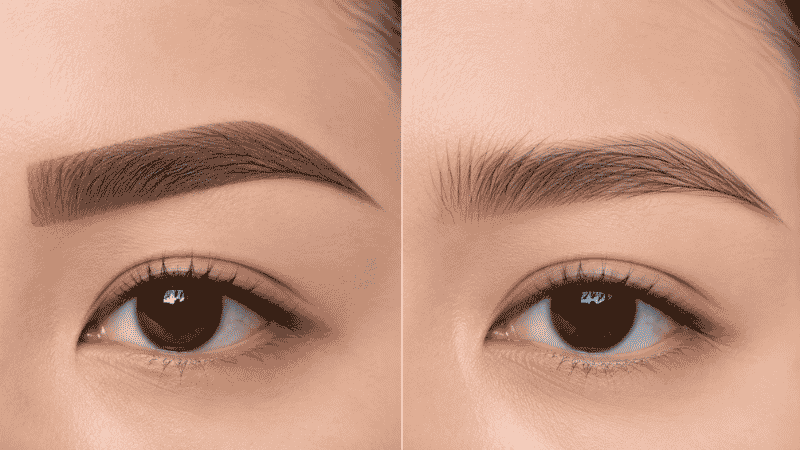
- Hair-like strokes, never a solid line — this is the single rule that separates natural brows from drawn-on ones
- Use the 3-point measuring method to find where your brows should start, arch, and end — it takes 30 seconds
- Eyebrow color should be one shade lighter than your brow hairs if they’re dark; one shade darker if they’re light or blonde
- Spoolie brush first, pencil second — brushing before filling shows you exactly where you need product
- The best beginner eyebrow pencils cost under $12 and outperform many high-end options
Where Should Eyebrows Start and End?
This is the most overlooked part of eyebrow filling — and it’s also the most important. Start in the wrong place, and nothing else you do will make your brows look right.
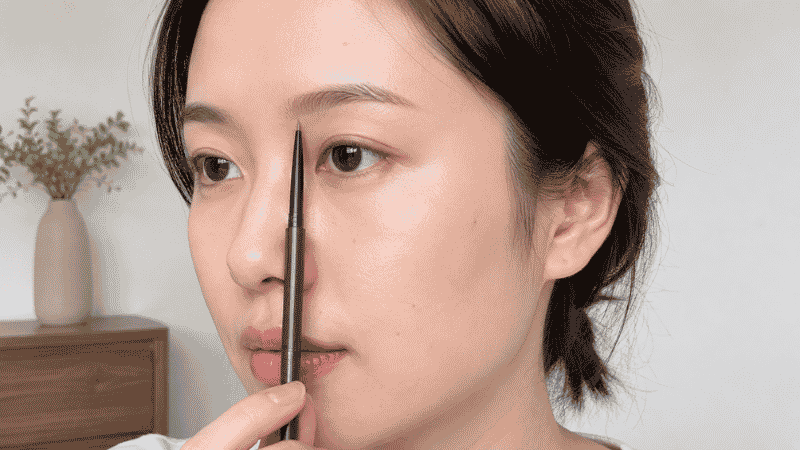
Here’s the 3-point rule that makeup artists use, simplified:
The start point: Hold a pencil (or any straight object) vertically against the side of your nose. Where it intersects your brow bone is where your eyebrow should begin. If your brow starts further toward the center of your face than this, it can make your nose look wider. If it starts too far out, you get a perpetually surprised expression.
The arch: Angle that same pencil from your nostril past the outer edge of your iris (the colored part of your eye). Where the pencil crosses your brow is roughly where your natural arch is — or where it should be emphasized.
The tail: Angle the pencil from your nostril to the outer corner of your eye. Where it intersects your brow line is where your eyebrow should end. Extending past this point is one of the most common beginner mistakes — it can make brows look droopy and elongated rather than lifted.
You only need to do this measuring once to internalize roughly where your brows live. After that, your natural shape will guide you.
Editor’s note: Most people’s eyebrows are already in roughly the right place naturally. The point of this exercise isn’t to redraw your brows from scratch — it’s to know where to fill and where to stop so you’re working with your face, not against it.
What Color Eyebrow Pencil Should I Use?
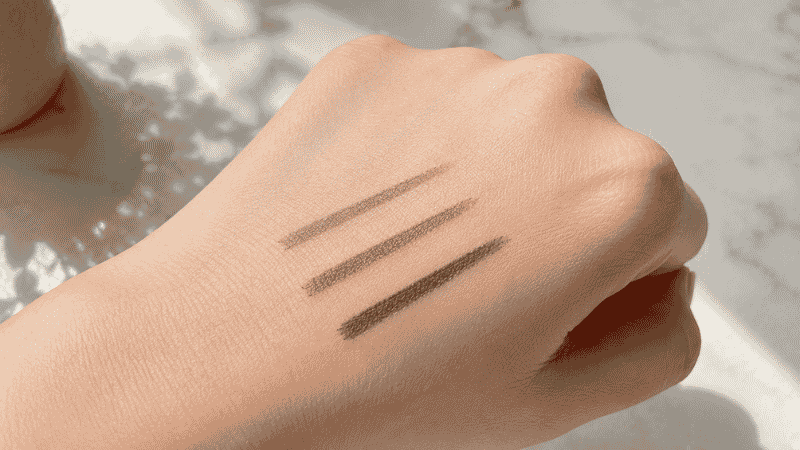
Eyebrow color is where a lot of beginners go wrong — usually by going too dark. The instinct is to match your brow color exactly, but brows that are too dark for your skin and hair look heavy and harsh rather than defined.
The general rule:
If your brows and hair are dark: Go one shade lighter than your actual brow color. Dark brows filled with a matching dark pencil end up looking solid and unnatural. One shade lighter keeps them defined without looking painted.
If your brows are light or blonde: Go one to two shades darker than your brow color. Very light brows filled with a matching light color can disappear entirely. A slightly darker shade gives definition without looking harsh.
If your hair is dyed a different color than your natural shade: Match your eyebrow pencil to your eyebrow hair, not your head hair. Your brow hairs are usually close to your natural hair color, regardless of what’s on your head.
The undertone matters too: Warm-toned skin tends to look better with warm-toned brow products (golden brown, warm taupe). Cool-toned skin looks better with ashier, cooler browns. If you’re not sure, taupe — a gray-brown — works on almost everyone.
Great drugstore options for beginners:
- L’Oréal Brow Stylist Definer (~$10) — ultra-fine tip, comes in great shades, often called the drugstore dupe for Benefit’s Precisely My Brow
- e.l.f. Precision Eyebrow Pencil (~$5) — incredibly affordable, fine tip, good range of shades
- NYX Micro Brow Pencil (~$10) — very precise, long-lasting, available in many undertone-specific shades
How to Fill in Eyebrows Step by Step (with Pencil)

Here’s the technique that makes brows look like brows, not like lines.
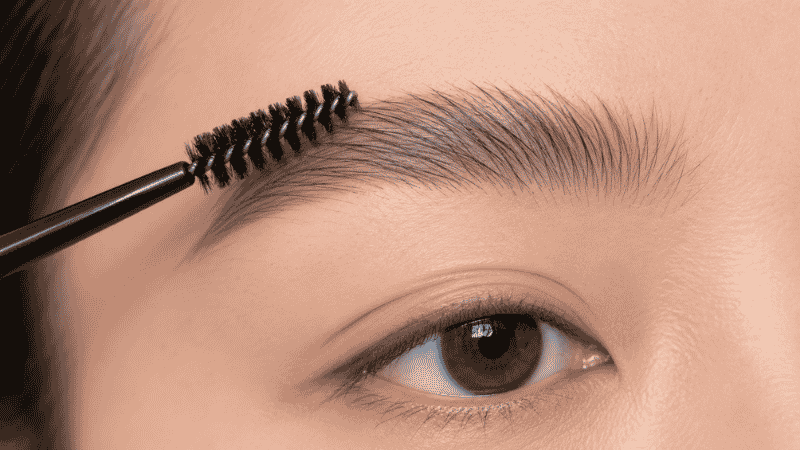
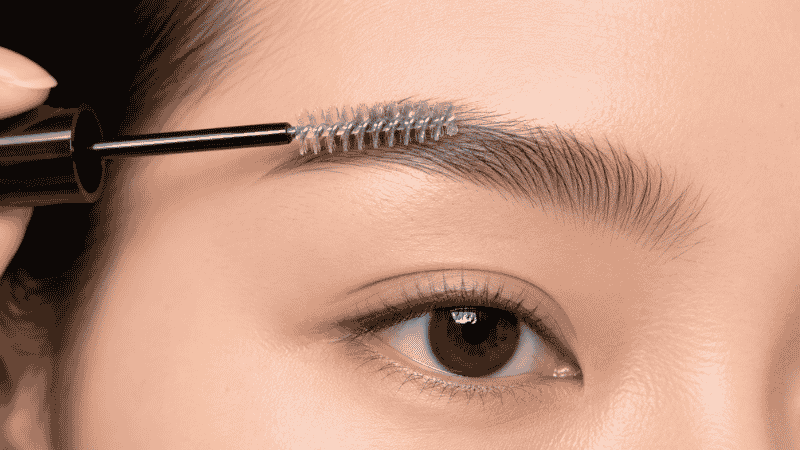
Step 1: Brush first. Use the spoolie end of your pencil (or a separate spoolie brush) to comb your brow hairs upward and outward. This does two things: it shows you the actual shape of your brows and reveals the sparse or missing areas where you actually need product. Filling before brushing means you’re guessing.
Step 2: Start in the middle, not the front. The front of your brows — closest to your nose — should always be the lightest, most natural-looking part. Most beginners start at the front and apply too much product there, which creates the boxy, block-like look. Start your filling from the arch area and work outward toward the tail.
Step 3: Use hair-like strokes, not a solid line. This is the most important technique point. Hold your pencil lightly, almost like you’re barely touching it to your skin, and make short, quick strokes in the direction your hair grows. You’re mimicking individual hairs, not filling in a coloring book. Think of drawing individual grass blades, not a carpet.
Step 4: Go back to the front with a very light hand. Once the arch and tail are done, go back to the inner section of your brow with barely any pressure. Use the lightest, faintest strokes here. The front of your brow should look like it fades naturally into your skin.
Step 5: Brush through again. Take your spoolie and brush through your brows one more time after filling. This blends the pencil strokes with your natural hairs and eliminates any harsh lines. This step is what separates brows that look real from brows that look drawn.
Step 6: Set with clear brow gel. Brush a clear brow gel through your brows to hold everything in place and keep hairs where you want them. This is especially helpful if your brow hairs are unruly or tend to drop by midday.
How to Fill in Sparse Eyebrows
Sparse brows — patches where hair is missing entirely — need a slightly different approach than filling in brows that just need definition.
The goal with sparse areas is to create the illusion of hair where there isn’t any. A solid fill in a missing patch looks flat and obvious. Hair-like strokes in the same direction as your surrounding hairs look like they belong there.
For very sparse or overplucked areas, a brow pomade or powder can be more forgiving than a pencil. Powder especially creates a soft, shadow-like effect underneath the existing hairs that makes them look fuller without adding visible individual “strokes” that can look fake in hairless areas.
The e.l.f. Instant Lift Brow Pencil (~$5) has a broader tip that’s better for filling larger sparse areas. For very patchy brows, try the NYX Fill & Fluff Eyebrow Pomade Pencil (~$10) — it deposits softer, more diffused color that reads as natural fullness rather than individual hair strokes.
One important note: when filling sparse areas, always check in natural light. Product that looks well-blended in bathroom lighting can look very different outside.
How to Fill in Thin Eyebrows Naturally
If your brows are naturally thin — fine-haired, narrow, or just small — the temptation is to draw outside your natural shape to create more volume. Resist this.
Drawing outside your natural brow shape almost always looks unnatural, because there’s no hair beneath the product to blend with. Instead, create the illusion of fullness within your existing shape:
Brush hairs upward. Even thin brows look significantly fuller when the hairs are brushed vertically upward rather than lying flat. A clear brow gel can hold them in place throughout the day.
Use powder, not pencil, as your primary product. Brow powder creates a soft shadow that makes thin brows appear thicker. Apply with an angled brush using light, horizontal strokes across the brow. The shadow underneath your existing hairs makes them look more substantial.
Add pencil only for definition. After powder, use a fine-tip pencil just at the tail and arch to add definition — not to fill the whole brow. This combination of powder for fullness and pencil for definition is the approach professional makeup artists use for thin brows.
How to Use Eyebrow Gel (And Why You Need It)
Eyebrow gel is one of the most underused products in a beginner’s kit. It comes in two forms — clear and tinted — and both do something a pencil or powder can’t: hold.
Clear brow gel is essentially hairspray for your brows. It keeps hairs in place, locks in whatever product you’ve applied, and prevents brows from fading throughout the day. It also works on its own on no-makeup days to keep your brows looking groomed without any color product.
Tinted brow gel adds light color and hold simultaneously, which makes it a great option on minimal-effort mornings when you don’t want to do a full brow routine. Brush it through from the inner corner outward and you’re done in 20 seconds.
How to use brow gel: After filling, take the gel wand and brush through your brows in upward, outward strokes — the same direction your hair grows. Don’t go back and forth; one direction only. Let it dry for 30 seconds before touching.
Affordable options:
- e.l.f. Wow Brow Gel (~$6) — clear, great hold, small and travel-friendly
- NYX Control Freak Brow Gel (~$7) — clear, excellent for very unruly brows
- L’Oréal Unbelieva-Brow (~$12) — tinted, extremely long-lasting, very natural finish
Eyebrow Mistakes Beginners Make (And How to Fix Them)
The block front. Heavy product at the inner corner of your brow creates a square, solid-looking start that looks nothing like real hair. Fix: start filling from the arch and apply almost no pressure at the inner third.
Going too dark. A shade that looks right in the product packaging often looks harsh on your face. Fix: go one shade lighter than you think you need, then build if necessary.
Perfect symmetry obsession. Trying to make both brows identical usually results in over-correcting one until both look wrong. Fix: aim for “sisters, not twins” — similar shape, not perfectly mirrored.
Skipping the spoolie. Filling without brushing first means you can’t see your natural shape or where the sparse areas actually are. Fix: always brush before and after filling.
Extending the tail too far. A tail that goes past the outer corner of your eye pulls the face downward. Fix: use the 3-point rule to find where your tail should end, and stop there.
When You Only Have 2 Minutes
Grab your spoolie and your brow gel. Brush your brows upward, apply tinted or clear brow gel through them, and done. Groomed, held-in-place brows with zero pencil work look considerably more polished than unfilled brows that have been left to do whatever they want. Come back to the full routine when you have more time.
FAQ
Where should eyebrows start and end?
Use the 3-point rule: hold a straight object vertically from the side of your nose — where it meets your brow is the start point. Angle it from your nostril past the outer edge of your iris for the arch. Angle it from your nostril to the outer corner of your eye for the tail endpoint.
What color eyebrow pencil should I use?
Match your eyebrow hairs, not your head hair. If your brow hairs are dark, go one shade lighter. If they’re light or blonde, go one to two shades darker. When in doubt, a cool-toned taupe works on almost every complexion.
How do I fill in eyebrows without them looking drawn on?
Use hair-like strokes instead of solid lines, start filling from the arch rather than the front, apply the lightest pressure at the inner corner, and always brush through with a spoolie at the end to blend everything together.
How do I fill in sparse eyebrows naturally?
Use brow powder or a soft pomade rather than pencil in hairless patches — powder creates a shadow effect that reads as natural fullness. Apply hair-like strokes in the same direction as surrounding hairs, and check in natural light before you finish.
Do I really need eyebrow gel?
Not strictly necessary, but it makes a noticeable difference — especially for unruly brows or long days. A clear brow gel costs around $6 and keeps everything in place all day. It’s one of the best value products in a beginner’s makeup kit.
Eyebrows Change Everything — When They’re Done Right
The difference between a face with well-groomed, naturally filled brows and a bare face is dramatic. Eyebrows frame your features and give your whole face more structure. But the key word is naturally — brows that look overdone or drawn-on actually pull more attention than no brows at all.
Light strokes. The right color. A spoolie to blend. That’s the whole formula.
Keep building your routine on MyColorKiss:
- Makeup Steps in Order: The Only Guide Beginners Actually Need — where eyebrows fit in your full routine
- How to Apply Mascara for Beginners — the eye step that goes hand-in-hand with brows
- Makeup Tutorial for Beginners: Your Easy Step-by-Step Guide — start from the very beginning
And remember — brows are supposed to look like yours, just more intentional. Not someone else’s, not a trend, not a perfect arch you saw on TikTok. Yours. That’s the whole goal.